

How To Repair Paneling On Walls
Wall Repair with patch and filler
The original owners used a multifariousness of patches over the years to cover the deficits, merely it was fourth dimension to pull off the patches and set them all for skillful. This discussion walks through a step by step arroyo to repairing holes in interior wood-paneled walls.
For the cabin walls, I was lucky to have a stock of the original cedar paneling boards to utilise as patch material. Finding a patch material that matches the thickness of the existing wall material is key, and what could be better than having spare stock of the original paneling?
My basic strategy for repairing the console holes is to mount a slightly under-sized patch inside the defect and then fill up in any remaining deficit with a solvent-based forest filler. For the wood filler, I similar Plastic Wood® brand. I tried many types of wood filler and establish the durability and brusque drying fourth dimension of Plastic Wood hard to crush.
To finish the repair, I used an orbital sander, once the forest filler was cured, to level. Finally, the repair was finished to lucifer the existing walls – in my case latex paint.
This technique of repairing a wall with a braced patch plus sanded filler can be used to repair a variety of deficits in wall constructed from many different materials. Dry wall or other building materials can be repaired using the same process, merely substitute a canvass rock patch or patch of whatsoever material you lot are repairing and a suitable filler.
OVERVIEW | Forest Paneling Wall Repair
SUPPLIES Listing | Woods Paneling Wall Repair
TOOLS LIST | Woods Paneling Wall Repair
STEPS | Wood Paneling Wall Repair
- Gather materials and tools
- Identify brace and secure to wall
- Cut patch material and secure to brace
- Add filler material
- Allow filler textile to dry, so sand wall repair flat
- Clean sanded repair and apply finish.
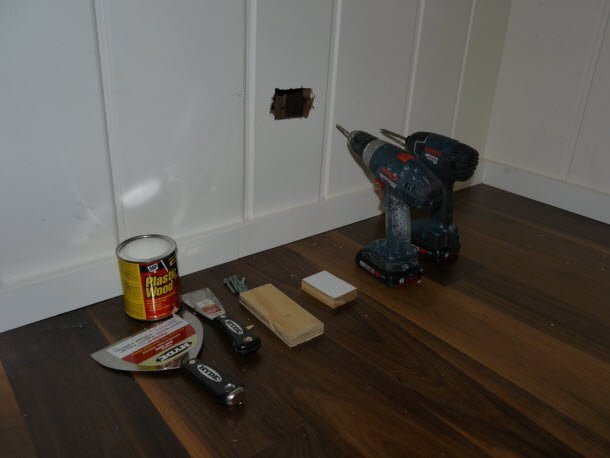
Gather tools – a cordless drill or screwdriver, orbital sander, a vacuum, and a putty pocketknife. For materials yous volition demand a brace to place inside the wall and a piece of patch material (normally the aforementioned fabric used to build the wall), a few woods deck screws, and a wood filler or plaster if repairing drywall.
Remove any loose textile from pigsty and hole edges. Drill pilot holes on 2 or more sides of the wall deficit to use to attach the bracing cloth placed backside the deficit.
Next, pass bracing cloth through the deficit and position it flat against the back of the wall. The cloth should overlap the hole backside the wall enough to allow passing screws through the previously drilled holes into the brace – typically 1 -2 inches of overlap on both sides of the deficit is enough.
Afterwards the plywood brace is in identify, drill through the existing pilot holes to extend the pilot holes into the brace cloth (this will make passing the screws into the brace much easier).
Then drive drywall screws through the pilot holes into the brace textile to secure the caryatid. Overdrive the screws into the wall face up past one/8 – i/four inch to let wood filler to embrace the screw heads.


Using a material of the aforementioned thickness (ideally, the same textile) cut a patch to fill up in well-nigh of the deficit. I was able to utilise the aforementioned cedar boards for the patches equally I had a stock of several erstwhile boards removed in other parts of the business firm. The patch demand non fit perfectly in the wall arrears, but should exist flush with the wall surface.
Once the wall patch is in place, secure this patch by screwing it to the previously placed brace by drilling a pilot hole and then passing a screw. Once more, countersink this spiral caput to allow for wood filler coverage.


Clean patched hole with vacuum or squeegee to prepare for the filler material. Using a putty knife or similar, utilise the filler and smooth with larger flat knife (I used a drywall joint knife). For forest paneling repairs apply a wood filler, for drywall repairs employ a drywall compound like plaster of paris.


Allow the filler to dry completely (check specific recommendations of the product you are using for drying times) before sanding. I used Plastic Wood® past DAP, which is a solvent based filler that dries very quickly — a few hours. Avoid using premixed h2o-based fillers intended for small holes repairs (Elmers®, ZAR® forest patch, etc.) equally they intended for very small holes and tend to crumble in this type of awarding.
In one case the filler is completely dry, sand the surface of the filler polish to friction match the surface of the existing wall. I used a iv″ orbital disk sander with 120 grit paper. To help keep dust downward, I fastened a vacuum to the orbital sander. The vacuum attachment works great and helps hold the sander to the surface of the repair.


Afterward sanding, clean the repair thoroughly. Next, end with paint or a end to match that of the existing wall. If painting, use the same applicator (brush, roller, specific roller comprehend, etc.) to lucifer the existing finish.


IMAGE GALLERY | Wood Paneling Wall Repair


How To Repair Paneling On Walls,
Source: https://cabindiy.com/how-to/wall-repair/
Posted by: alvaradoholf1975.blogspot.com
0 Response to "How To Repair Paneling On Walls"
Post a Comment